Rotoscoping is one of the oldest techniques for animation, involving the tracing of live-action footage, frame by frame, to create an animated version of the movement that may later be modified to create a fantastic video short.
Creative Inspiration
Out of the Inkwell Max Fleischer, 1921
American Pop Ralph Bashki, 1982
Apocalypse Management Chris Doyle, 2009
Instructions To Rotoscope in Photoshop
- Step by Step Instructions
- 1. Open Photoshop
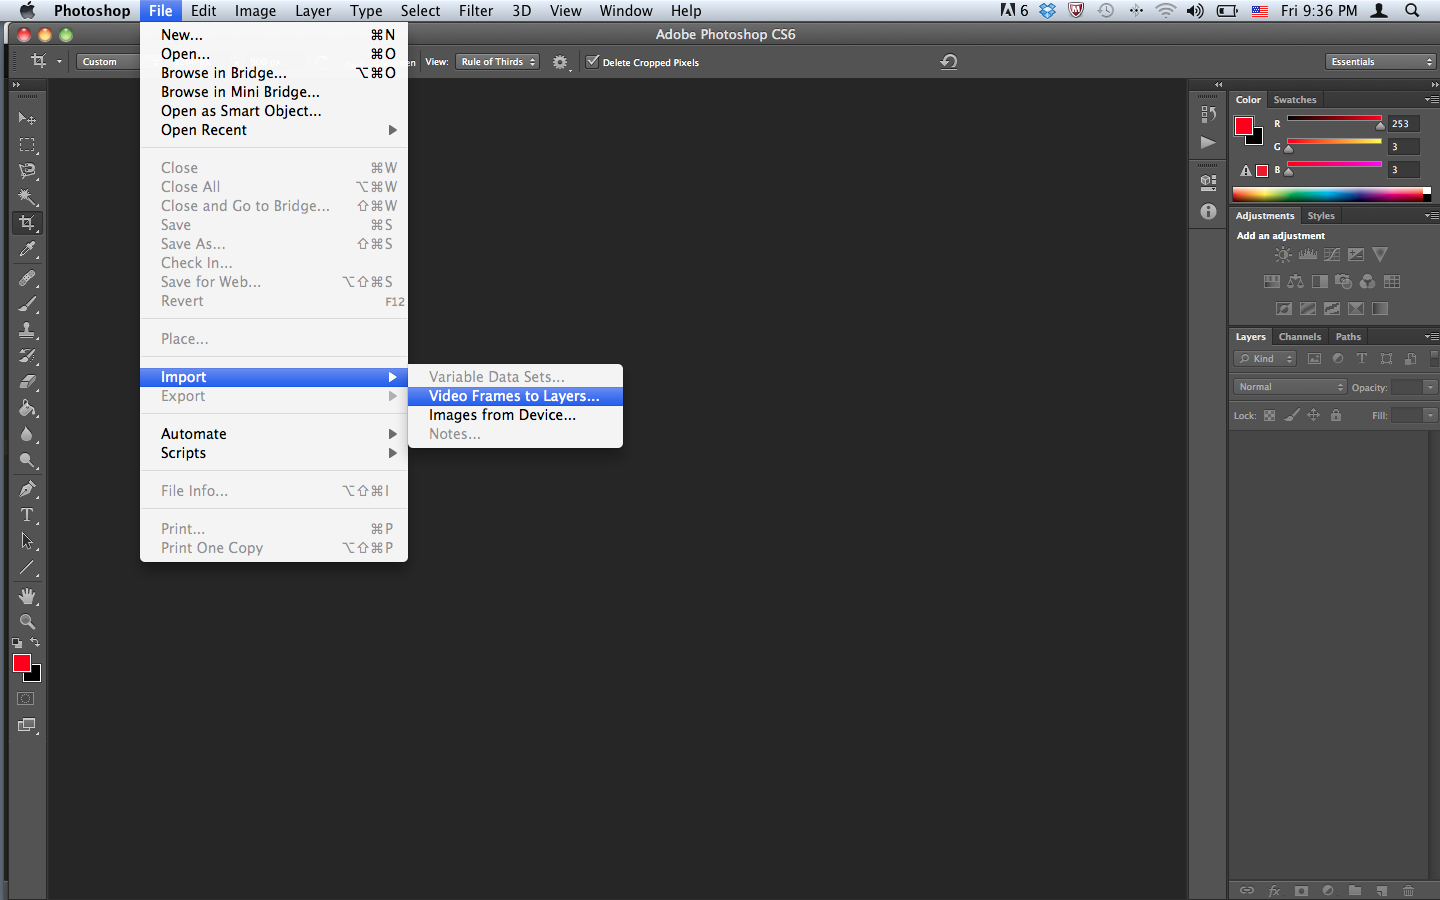
- 2. From the top menu: File > Import > Video Frames to Layers...
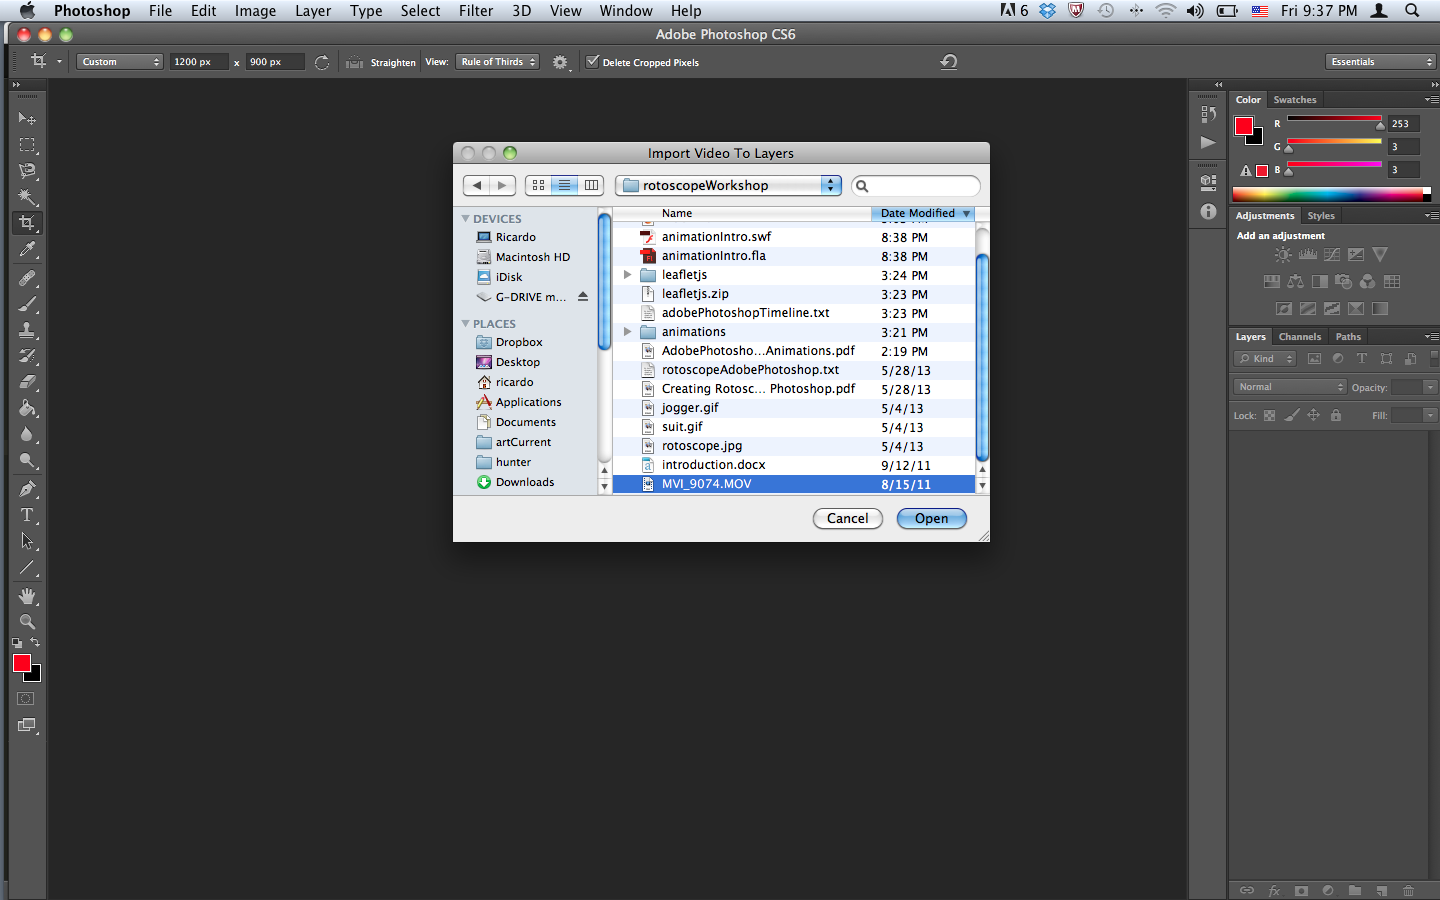
- 3. Navigate to and select video to import
- 4. Use the Import Videos to Layers dialog window with the following settings:
- Selected Range Only
- Limit to Every 2 Frames
- Make Frame Animation
Note on Frame Rate: Video is commonly either 29.97 fps or 24 fps, drawn and stop motion animation may have a frame rate as low as 15 or 12 fps. For this exercise I recommend 15fps.
- 5. Open from Photoshop's top menu: Window > Timeline to see the imported stills in the Photoshop Timeline (if it is not already open). Note: If you wish for the layer names to reflect the frame number use the Timeline menu (top right corner of Timeline panel) and select - "Flatten Frames Into Layers", this will retitle the layers as frames.
- 6. In the Timeline, you may slow or quicken the video by selecting all frames and changing the time setting that is the decimal number at the bottom of each frame (you may also of course slow individual frames). You may also delete frames by selecting them and clicking the trash icon. If you delete frames you will want to delete the corresponding layers.
- NOTE: If you wish to export the frames as files to work in a different application, do so now: File > Export > Layers to Files and be sure to export to a new folder. I recommend exporing as JPEG at a quality of 10.
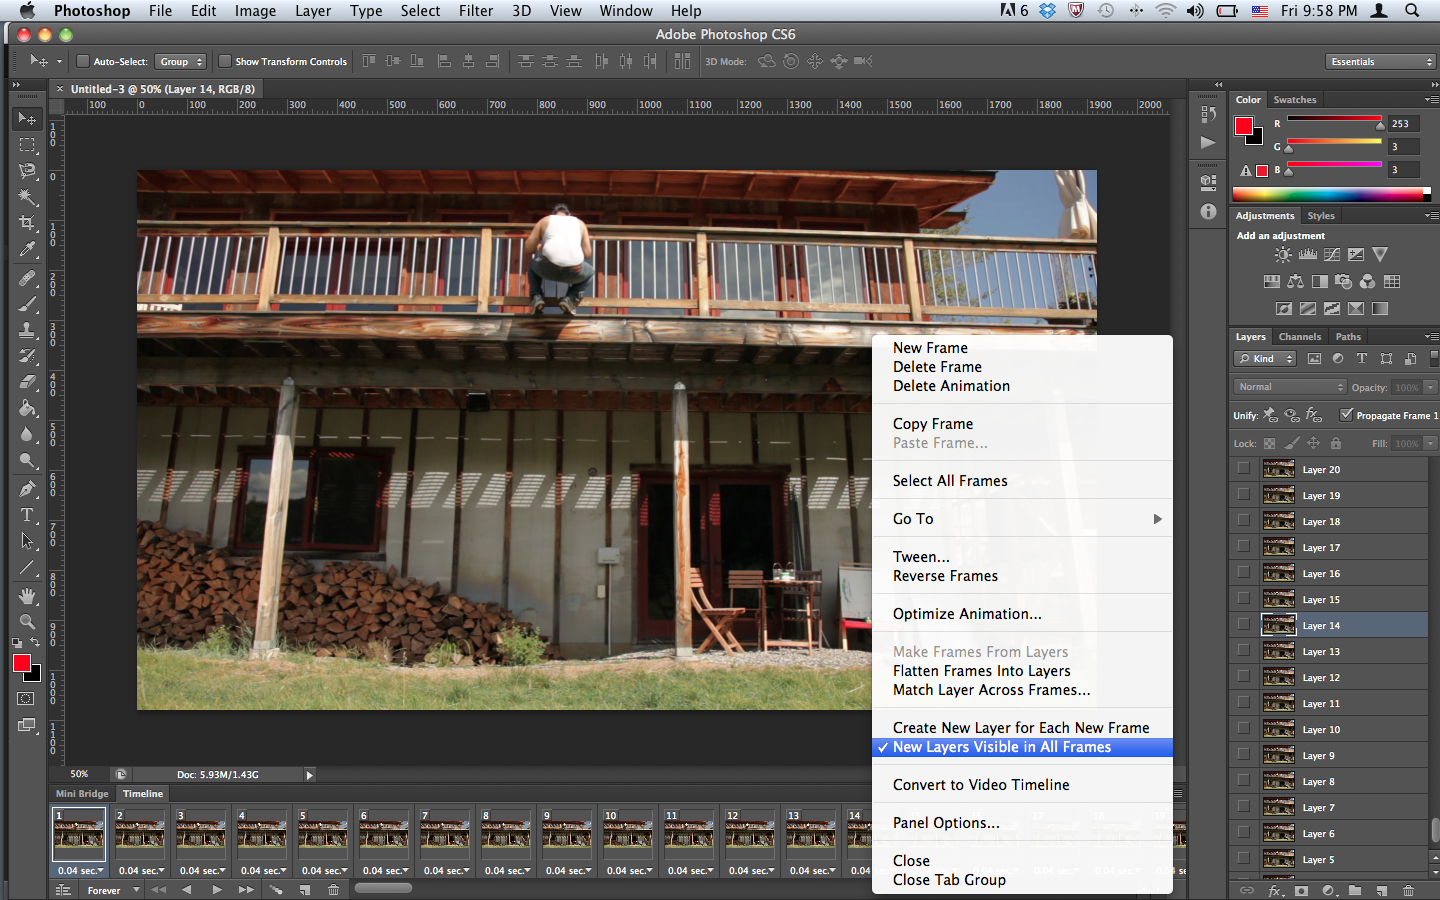
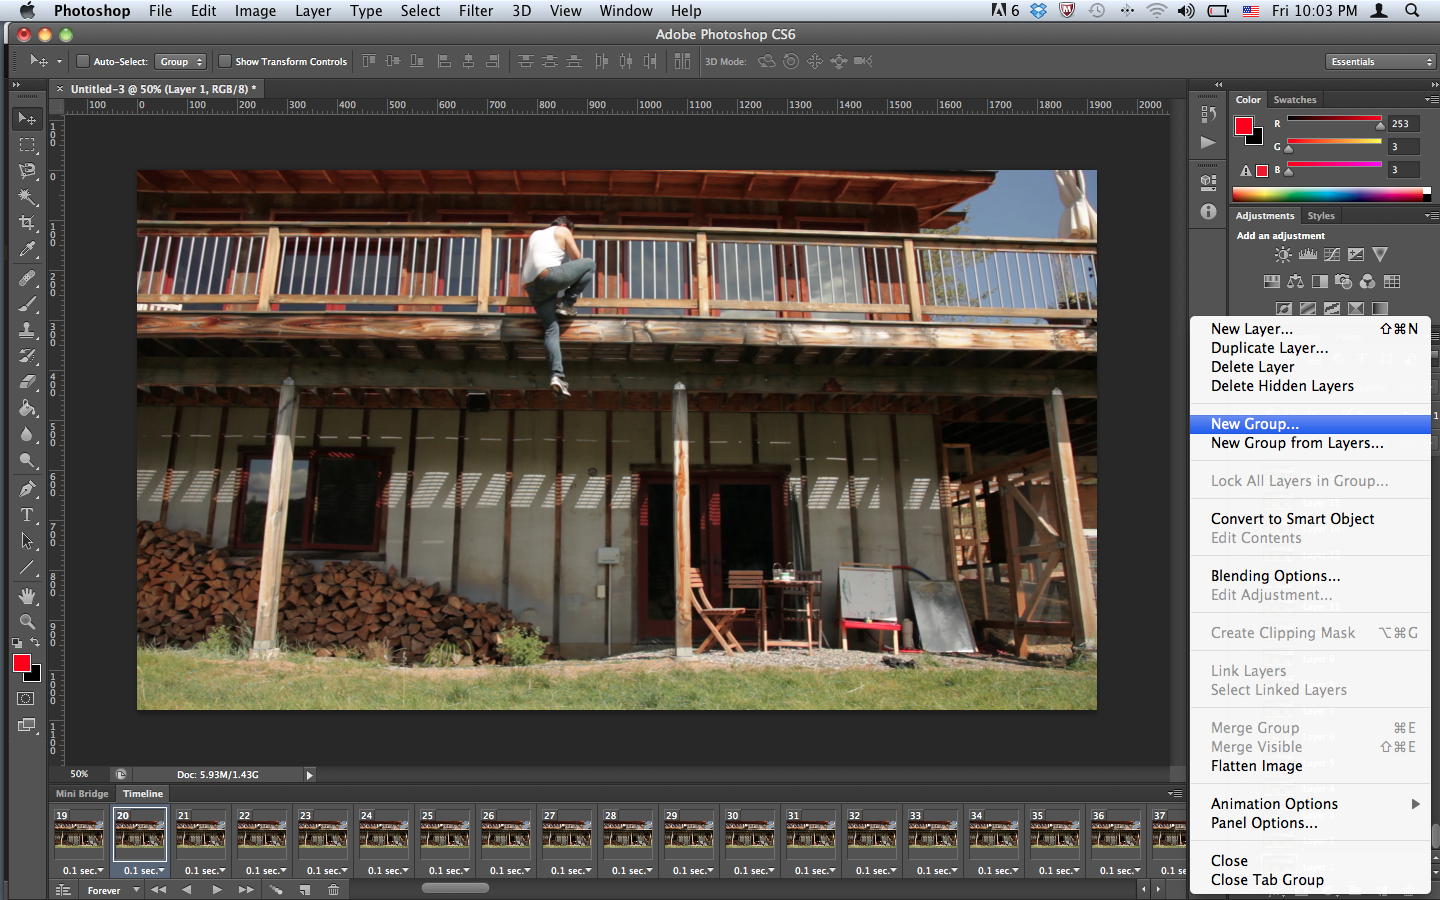
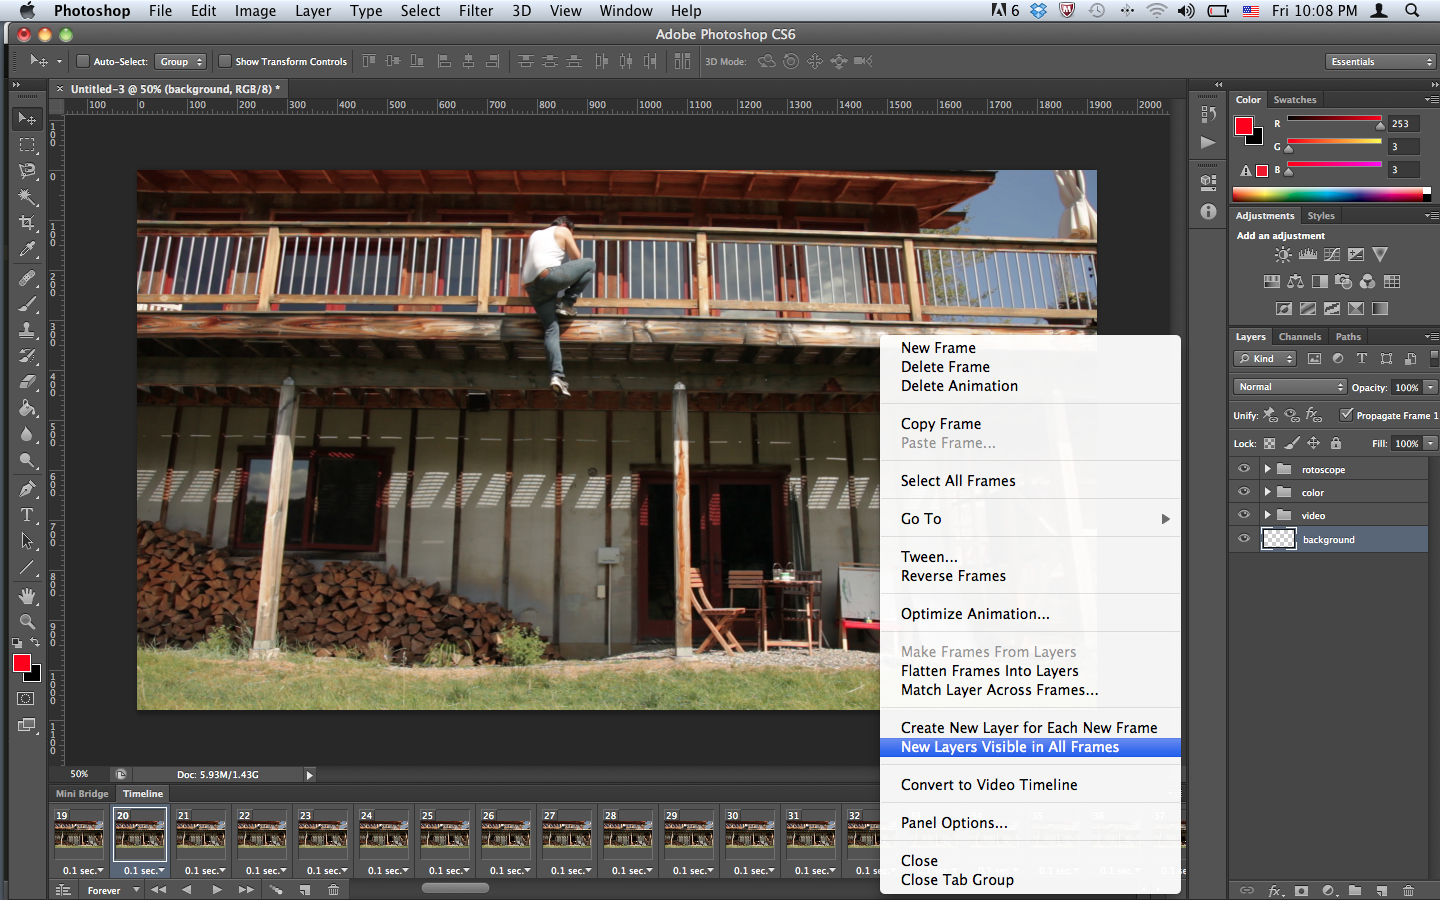
- 7. From the menu icon at the top right corner of the Timeline Panel select the option "New Layers Visible in All Frames".
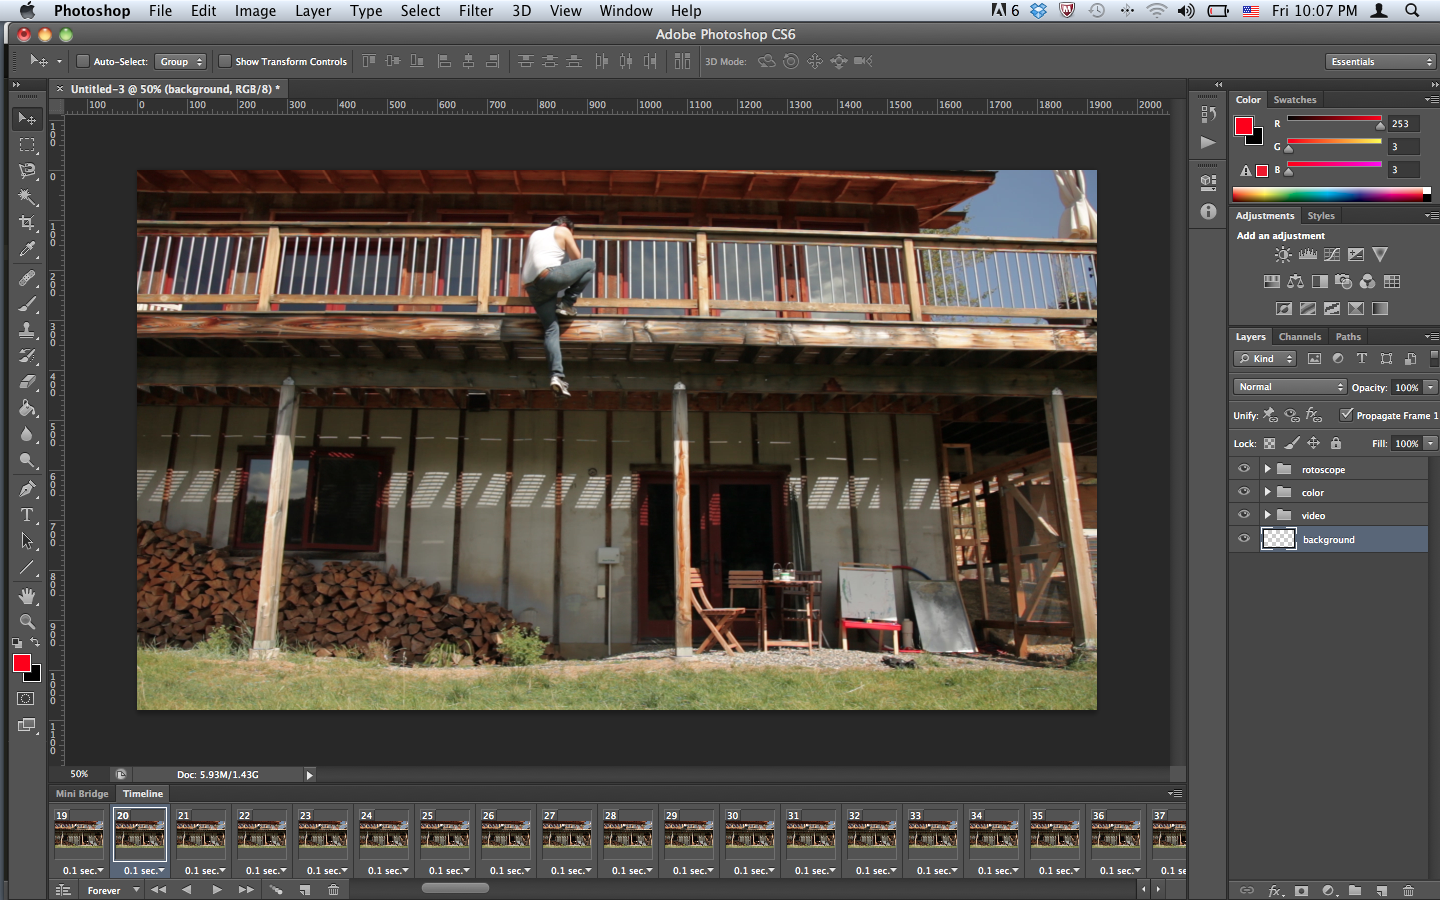
- 8. Now group the video layers by placing all the layers in one folder. In the layer panel, select all you layers and drag them into the folder icon at the bottom of the Layers panel. This icon is the "Create a new group" function. By grouping the layers, you may now make canvas and image size changes to all the layers at once by selecting the group folder. Grouping layers also organizes your content.
- 9. Currently HD pixel dimension is commonly 1920 x 1080. The canvas size will be set according to the dimensions of the imported video. You may change the canvas size if you wish the animation to be a different resolution than the imported video. Select the video group and go to Image > Canvas size if a size change is desired (bigger is better, I suggest resizing to 1920 x 1080 if it is not already).
- 10. Create two more separate New Layer Groups: "Color" and "Rotoscope". Order the layer groups so that Rotoscoping is at the top, Color is below and Video is below Color.
- 11. Create a New Layer and place below all the layer groups to add a background
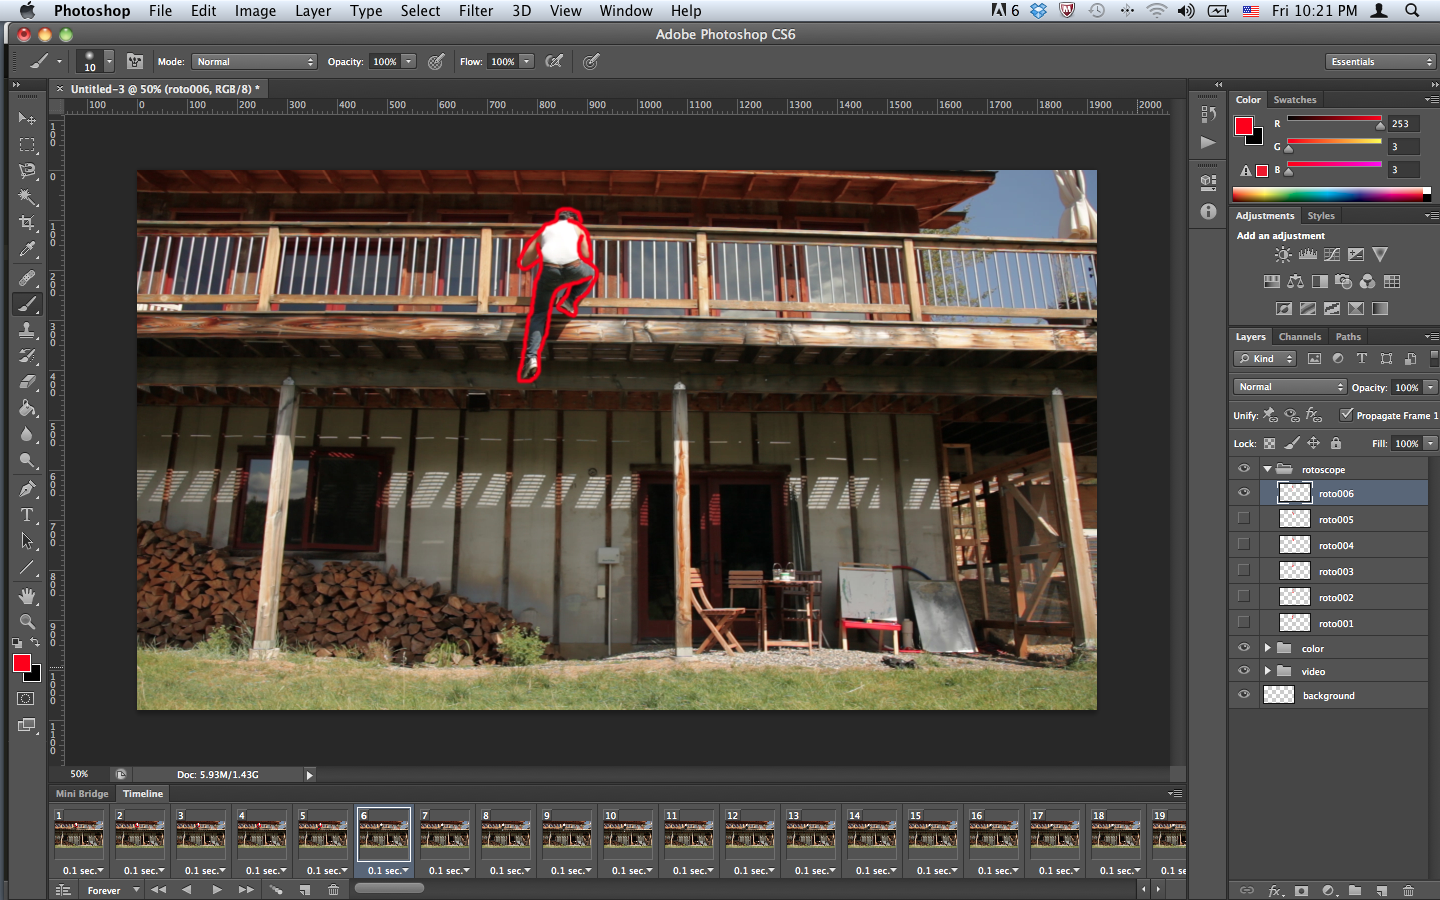
- 12. Once you have created all the New Layer Groups that you wish to apply to each frame of the animation, deselect "New Layers Visible in All Frames" from the menu at the top right corner of the Timeline Panel. This way new layers will only be visible in the selected frame only and not all frames.
- 13. Select the first frame and create a new layer in the rotoscope group and select a drawing tool to start rotoscoping. Each drawing will require its own layer in the rotoscope group, make sure to select the frame that you wish to draw over, before creating the new layer.
- 14. Do the same in the Color group if you wish to paint or color the rotoscoped artwork.
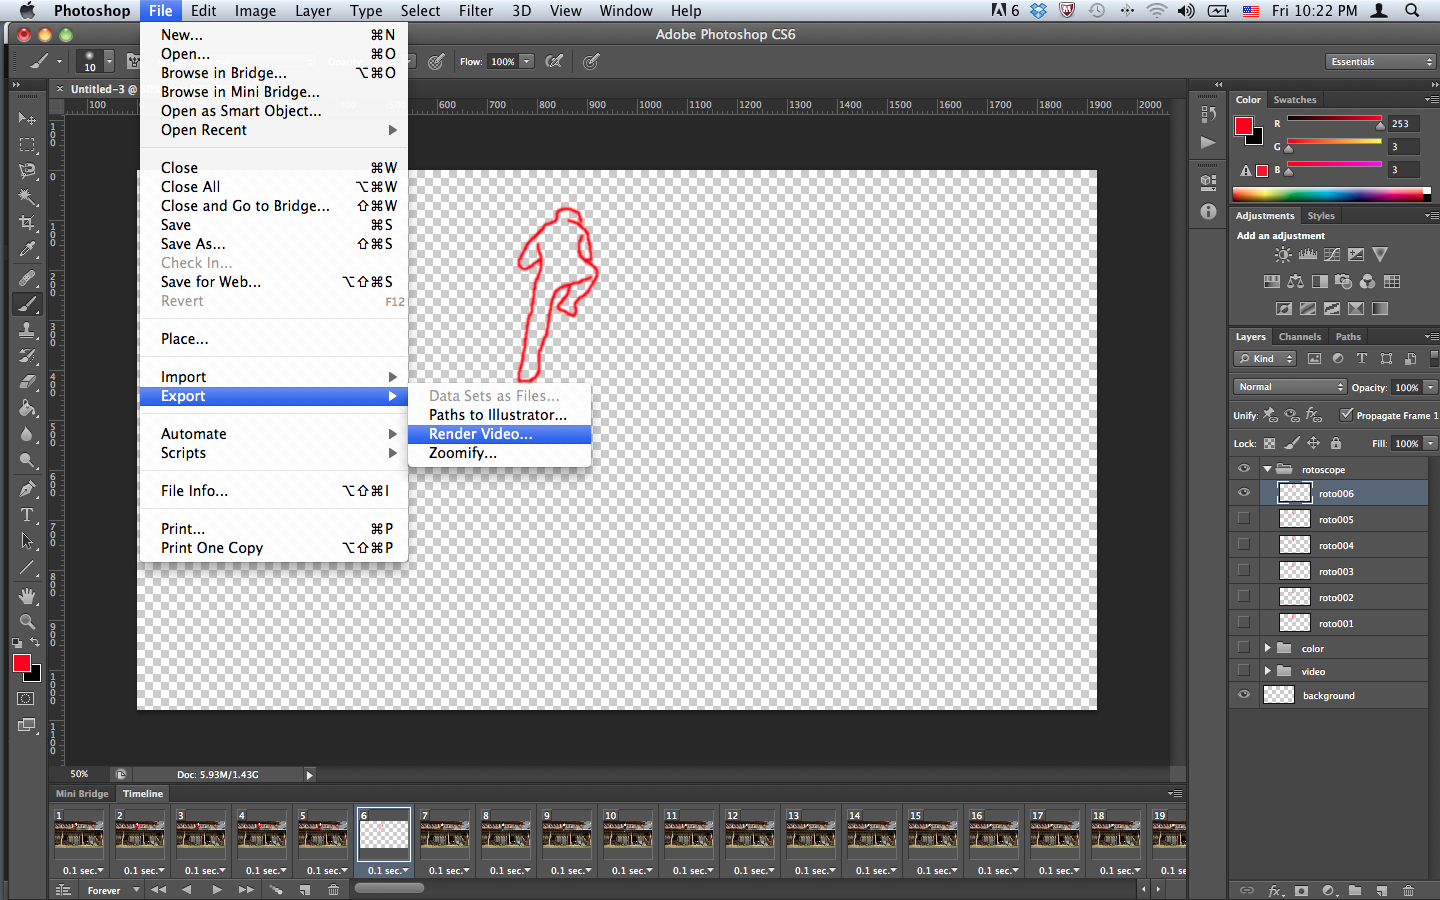
- 15. Once the drawing and painting is complete and a background is set, hide the video group to export the animation by selecting all frames in the Timeline and then clicking the eye icon or visibility icon of the Video layer in the layers panel. Once the video image is no longer visible go to File > Export > Render Video and choose the preferred settings.
- 16. The drawing may be exported as a video file, a gif animation or as an image sequence that may be used for compositing in video software such as AfterEffects or Premiere. If you plan to do further compositing in video software, save each frame indivdually without the background image. If the frames are saved as an image sequence, they may be imported as a group into video software. It is best to insert the background in the video software.
Helpful Link: Photoshop Timeline Animation Workflow
Screen captures of step by step instructions


Instructions To Rotoscope in Animate
- Step by Step Instructions
- 1. Open Animate - New Document HTML5 or Canvas or ActionScript3
- 2. Set dimensions by going to Modify > Document > change Stage size (currently HD pixel dimensions is commonly 1920 x 1080)
- 3. File > Import > Import To Stage and select all the exported PNG files (see steps 1-6 above to export video as an image sequence usign Photoshop)
- 4. All the files will import to the first key frame. Use the Align tool to center the images on to the stage
- 5. Place each image on a unique keyframe on the timeline, one image after the next: Modify > Timeline > Distribute to Keyframes.
- 6. Remove the empty first keyframe and name and lock the layer with the images
- 7. Create new layer(s) for animation and convert each frame into a blank keyframe if you will be redrawing each frame
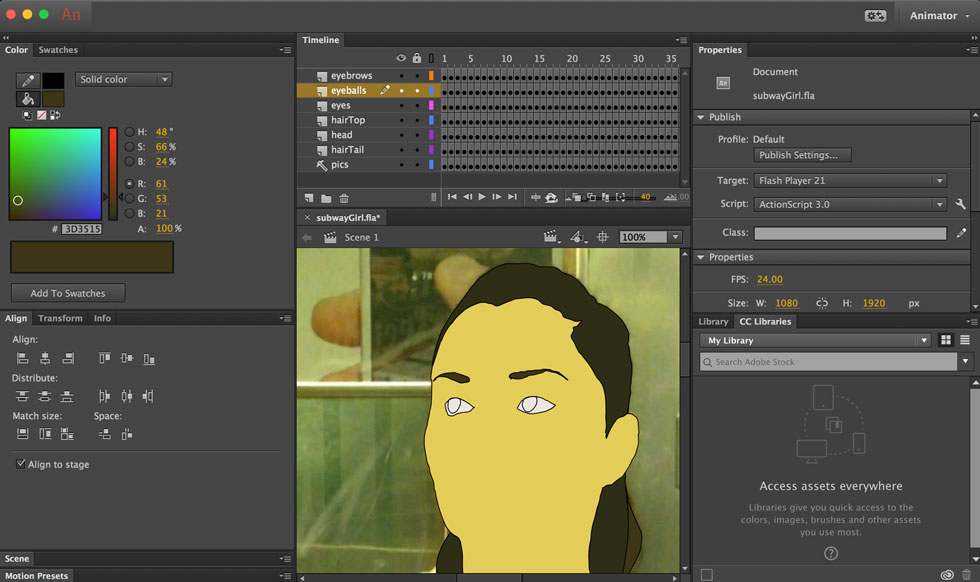
- 8. Use layers to organize your work, such as creating a layer for the line drawing and a layer for color... I tend to create a new layer for each closed shape as this allows me to add color more quickly after the drawing is done. Just like Illustrator, Animate is an SVG-based application in which graphic objects are interpreted as paths and fills. If a path is closed, you may select it and use the color tool to add a fill. Below is a screen shot of an animation with one human subject, each feature is on its own layer.
- 9. File > Export > Export Movie or Export Video, depending on how you plan to distribute.